Managing Forms with React Hook Form
Updated on · 9 min read|
Working with forms in React is notoriously difficult, particularly when there are dynamic fields involved. There exist several libraries that make the whole process easier. One such library is React Hook Form. In this post, we'll talk about the basics of React Hook Form and learn how to use it to simplify form management in React applications.
We're going to walk through the process of creating a simple recipe form using React Hook Form. This form will include basic details along with a dynamic list of ingredients. By the end of this post, we will have a functional form that looks like this:
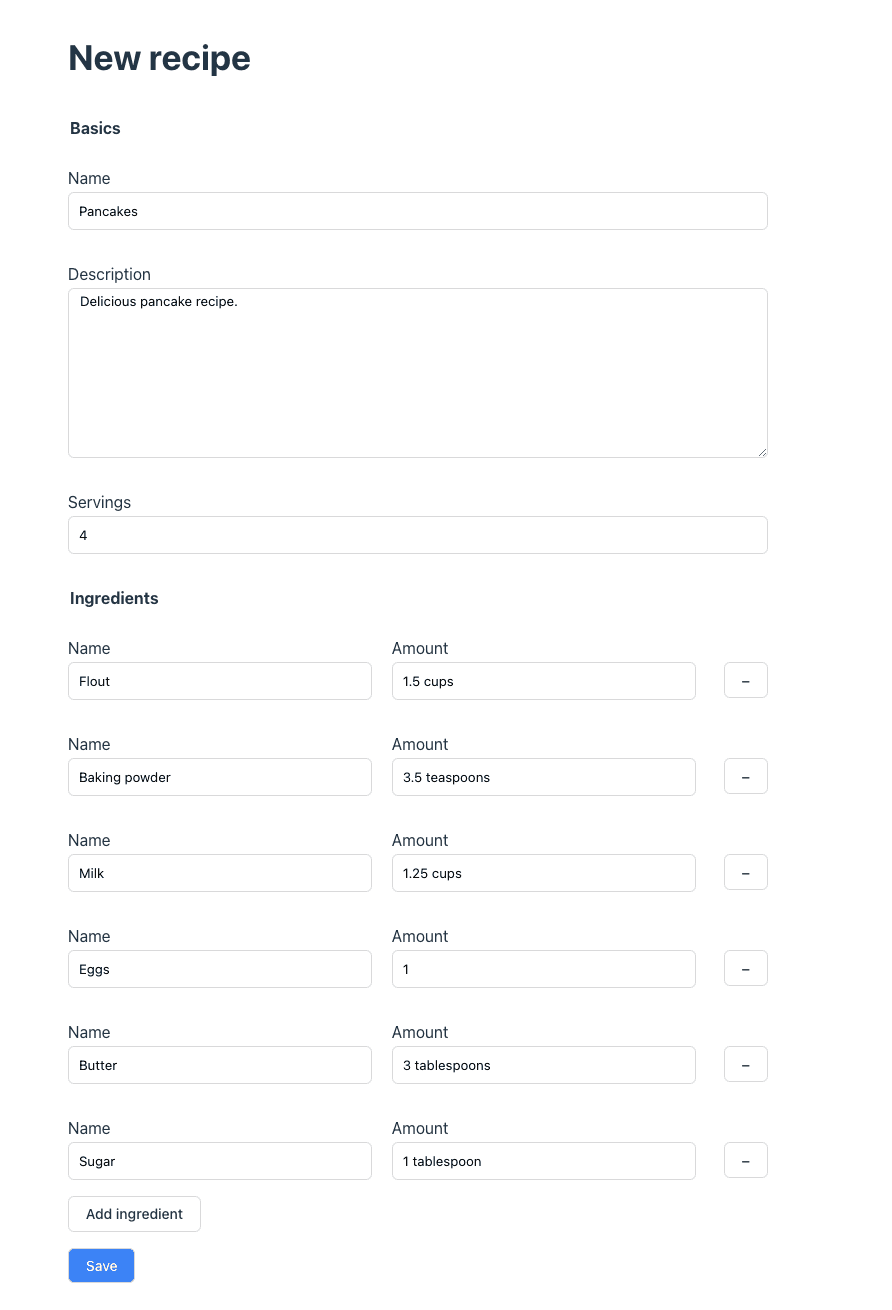
The final version of the code is available on GitHub.
This post covers the fundamentals of working with React Hook Form. If you're curious about more advanced use cases, you may find these posts helpful:
-
Working with multistep forms: Build a Multistep Form With React Hook Form.
-
Saving form data during step navigation and displaying the state of each step in the Stepper component: Advanced Multistep Forms with React Hook Form.
-
Displaying a warning if a user attempts to navigate away from the form while having unsaved data in the form: Display Warning for Unsaved Form Data on Page Exit.
Setup
Apart from the React Hook Form, we'll be using @emotion/styled library to add a bit of styling to the form components. Additionally, we'll be using TypeScript, which can be added following the instructions on its website. The project is using a default tsconfig for React.
We begin by installing all the required dependencies.
bashnpm i @emotion/core @emotion/styled react-hook-form
bashnpm i @emotion/core @emotion/styled react-hook-form
Now we can set up our form component in a new file, called RecipeForm.tsx.
jsx// RecipeForm.tsx import styled from "@emotion/styled"; export const Recipe = () => { return ( <Container> <h1>New recipe</h1> </Container> ); }; const Container = styled.div` display: flex; flex-direction: column; max-width: 700px; `;
jsx// RecipeForm.tsx import styled from "@emotion/styled"; export const Recipe = () => { return ( <Container> <h1>New recipe</h1> </Container> ); }; const Container = styled.div` display: flex; flex-direction: column; max-width: 700px; `;
Form Basics
With all this setup out of the way, we can finally start working on the form itself. We'll begin with the Basics section, which will have general information about the recipe. To help with grouping form fields into sections, let's add a custom component, called FieldSet, which is a small abstraction on top of the native HTML fieldset.
tsx// FieldSet.tsx import styled from "@emotion/styled"; import React from "react"; interface FieldSetProps { label?: string; children: React.ReactNode; } export const FieldSet = ({ label, children }: FieldSetProps) => { return ( <Container> {label && <Legend>{label}</Legend>} <Wrapper>{children}</Wrapper> </Container> ); }; const Container = styled.fieldset` margin: 16px 0; padding: 0; border: none; `; const Wrapper = styled.div` display: flex; justify-content: space-between; flex-direction: column; align-items: self-start; `; const Legend = styled.legend` font-size: 16px; font-weight: bold; margin-bottom: 10px; `;
tsx// FieldSet.tsx import styled from "@emotion/styled"; import React from "react"; interface FieldSetProps { label?: string; children: React.ReactNode; } export const FieldSet = ({ label, children }: FieldSetProps) => { return ( <Container> {label && <Legend>{label}</Legend>} <Wrapper>{children}</Wrapper> </Container> ); }; const Container = styled.fieldset` margin: 16px 0; padding: 0; border: none; `; const Wrapper = styled.div` display: flex; justify-content: space-between; flex-direction: column; align-items: self-start; `; const Legend = styled.legend` font-size: 16px; font-weight: bold; margin-bottom: 10px; `;
Additionally, we will streamline the form field logic by extracting it into a separate component called Field. This component will be responsible for rendering input elements and their corresponding labels, as well as managing field error logic, making our code more readable and maintainable.
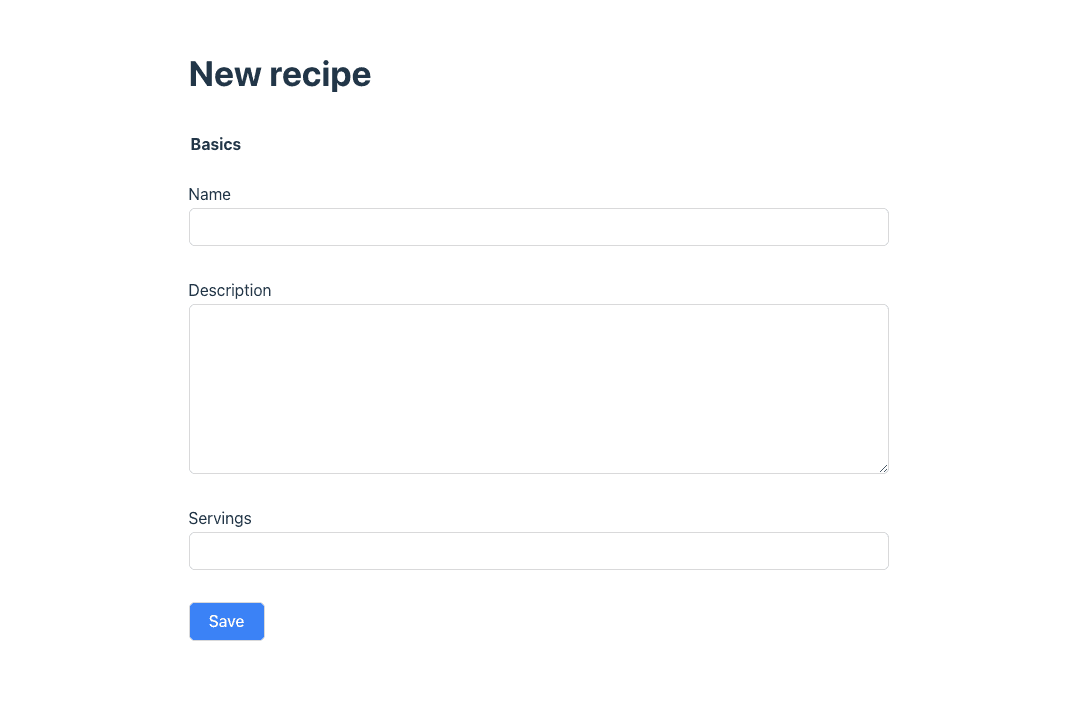
Now it's time to create the form. For this simple recipe form, we'll only have a few basic fields, such as recipe name, description, and number of servings.
tsx// RecipeForm.tsx import styled from "@emotion/styled"; import { FieldSet } from "./FieldSet"; import { Field } from "./Field"; export const RecipeForm = () => { return ( <Container> <h1>New recipe</h1> <form> <FieldSet label="Basics"> <Field label="Name"> <Input type="text" name="name" id="name" /> </Field> <Field label="Description"> <TextArea name="description" id="description" rows={10} /> </Field> <Field label="Servings"> <Input type="number" name="amount" id="amount" /> </Field> </FieldSet> <Field> <Button variant="primary">Save</Button> </Field> </form> </Container> ); }; const Container = styled.div` display: flex; flex-direction: column; max-width: 700px; `; const Input = styled.input` box-sizing: border-box; padding: 10px; width: 100%; border: 1px solid #d9d9d9; border-radius: 6px; `; const TextArea = styled.textarea` box-sizing: border-box; padding: 4px 11px; width: 100%; border: 1px solid #d9d9d9; border-radius: 6px; `; const Button = styled.button<{ variant?: "primary" | "secondary" }>` font-size: 14px; cursor: pointer; padding: 0.6em 1.2em; border: 1px solid #d9d9d9; border-radius: 6px; margin-right: auto; background-color: ${({ variant }) => variant === "primary" ? "#3b82f6" : "white"}; color: ${({ variant }) => (variant === "primary" ? "white" : "#213547")}; `;
tsx// RecipeForm.tsx import styled from "@emotion/styled"; import { FieldSet } from "./FieldSet"; import { Field } from "./Field"; export const RecipeForm = () => { return ( <Container> <h1>New recipe</h1> <form> <FieldSet label="Basics"> <Field label="Name"> <Input type="text" name="name" id="name" /> </Field> <Field label="Description"> <TextArea name="description" id="description" rows={10} /> </Field> <Field label="Servings"> <Input type="number" name="amount" id="amount" /> </Field> </FieldSet> <Field> <Button variant="primary">Save</Button> </Field> </form> </Container> ); }; const Container = styled.div` display: flex; flex-direction: column; max-width: 700px; `; const Input = styled.input` box-sizing: border-box; padding: 10px; width: 100%; border: 1px solid #d9d9d9; border-radius: 6px; `; const TextArea = styled.textarea` box-sizing: border-box; padding: 4px 11px; width: 100%; border: 1px solid #d9d9d9; border-radius: 6px; `; const Button = styled.button<{ variant?: "primary" | "secondary" }>` font-size: 14px; cursor: pointer; padding: 0.6em 1.2em; border: 1px solid #d9d9d9; border-radius: 6px; margin-right: auto; background-color: ${({ variant }) => variant === "primary" ? "#3b82f6" : "white"}; color: ${({ variant }) => (variant === "primary" ? "white" : "#213547")}; `;
In this step, we add the recipe fields along with their labels, creating a simple form shown below. Note the use of the name attributes on the form elements, as they will prove useful shortly.
Adding React Hook Form
Now, let's leverage React Hook Form to manage our form's state. One of the key benefits of this library is that it simplifies state management, eliminating the need for multiple useState hooks. All we have to do is use the register function with the field's name as an argument to register fields within the form's state.
tsximport styled from "@emotion/styled"; import { useForm } from "react-hook-form"; import { Field } from "./Field"; import { FieldSet } from "./FieldSet"; import { Recipe } from "./types"; export const RecipeForm = () => { const { register, handleSubmit } = useForm<Recipe>(); const submitForm = (formData: Recipe) => { console.log(formData); }; return ( <Container> <h1>New recipe</h1> <form onSubmit={handleSubmit(submitForm)}> <FieldSet label="Basics"> <Field label="Name"> <Input {...register("name")} type="text" id="name" /> </Field> <Field label="Description"> <TextArea {...register("description")} id="description" rows={10} /> </Field> <Field label="Servings"> <Input {...register("amount")} type="number" id="amount" /> </Field> </FieldSet> <Field> <Button variant="primary">Save</Button> </Field> </form> </Container> ); };
tsximport styled from "@emotion/styled"; import { useForm } from "react-hook-form"; import { Field } from "./Field"; import { FieldSet } from "./FieldSet"; import { Recipe } from "./types"; export const RecipeForm = () => { const { register, handleSubmit } = useForm<Recipe>(); const submitForm = (formData: Recipe) => { console.log(formData); }; return ( <Container> <h1>New recipe</h1> <form onSubmit={handleSubmit(submitForm)}> <FieldSet label="Basics"> <Field label="Name"> <Input {...register("name")} type="text" id="name" /> </Field> <Field label="Description"> <TextArea {...register("description")} id="description" rows={10} /> </Field> <Field label="Servings"> <Input {...register("amount")} type="number" id="amount" /> </Field> </FieldSet> <Field> <Button variant="primary">Save</Button> </Field> </form> </Container> ); };
We begin by importing and invoking the useForm hook, which returns several helpful utilities. In this instance, we use register to associate a form field with its corresponding property on the state via the field's name. This is why adding names to the fields is crucial here. Additionally, we need to wrap our submit function in the handleSubmit callback.
The types are defined in a separate file, types.ts. To make sure that the fields are correctly typed, we need to define the Recipe type, which will be passed as a generic type argument to the useForm hook. Alternatively, we can use defaulValues to set the initial values for the form fields, from which the types will be inferred.
tsxexport type Recipe = { name: string; picture: string; description: string; amount: number; ingredients: Ingredient[]; }; export type Ingredient = { name: string; amount: string; };
tsxexport type Recipe = { name: string; picture: string; description: string; amount: number; ingredients: Ingredient[]; }; export type Ingredient = { name: string; amount: string; };
Now, if we enter recipe details in the form fields and press Save, we should see the following object displayed in the console:
json{ "name": "Pancakes", "description": "Super delicious pancake recipe", "amount": "10" }
json{ "name": "Pancakes", "description": "Super delicious pancake recipe", "amount": "10" }
That's all the setup needed to start using React Hook Form. However, its functionality doesn't end here. Next, we'll see a few enhancements we can add to our form.

Form validation and error handling
The register value returned from useForm is a function that accepts validation rules as an object for its second parameter. Several validation rules are available:
- required
- min
- max
- minLength
- maxLength
- pattern
- validate
To make the recipe name a required field, all we need to do is call register with a required prop:
jsx<Input {...register("name", { required: true })} type="text" id="name" />
jsx<Input {...register("name", { required: true })} type="text" id="name" />
Additionally, the useForm function returns a formState object that contains an errors attribute. This attribute maps all the raised errors to their corresponding field names. For instance, in the case of a missing recipe name, the errors object would have a name attribute with a type of required.
It's worth noting that instead of specifying the required validation rule with a boolean value, we can also pass it a string, which will be used as the error message.
jsx<Input {...register("name", { required: "This field is required" })} type="text" id="name" />
jsx<Input {...register("name", { required: "This field is required" })} type="text" id="name" />
Alternatively, we can use the message property to specify an error message. This message can be accessed later via errors.name.message. We can then pass this error object to the Field component to toggle the error state.
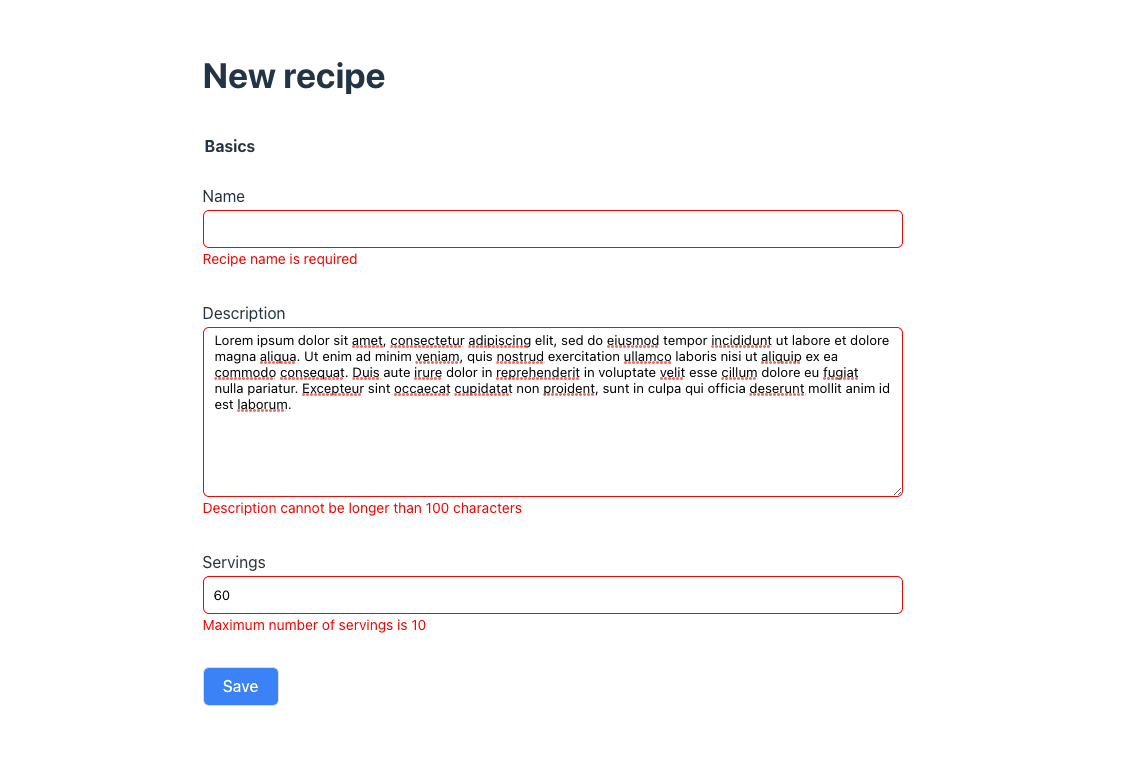
By combining form validation and errors, we can display helpful messages for the users.
tsximport styled from "@emotion/styled"; import { useForm } from "react-hook-form"; import { Field } from "./Field"; import { FieldSet } from "./FieldSet"; import { Recipe } from "./types"; export const RecipeForm = () => { const { register, formState: { errors }, handleSubmit, } = useForm<Recipe>(); const submitForm = (formData: Recipe) => { console.log(formData); }; return ( <Container> <h1>New recipe</h1> <form onSubmit={handleSubmit(submitForm)}> <FieldSet label="Basics"> <Field label="Name" error={errors.name}> <Input {...register("name", { required: "Recipe name is required" })} type="text" id="name" /> </Field> <Field label="Description" error={errors.description}> <TextArea {...register("description", { maxLength: { value: 100, message: "Description cannot be longer than 100 characters", }, })} id="description" rows={10} /> </Field> <Field label="Servings" error={errors.amount}> <Input {...register("amount", { max: { value: 10, message: "Maximum number of servings is 10", }, })} type="number" id="amount" /> </Field> </FieldSet> <Field> <Button variant="primary">Save</Button> </Field> </form> </Container> ); };
tsximport styled from "@emotion/styled"; import { useForm } from "react-hook-form"; import { Field } from "./Field"; import { FieldSet } from "./FieldSet"; import { Recipe } from "./types"; export const RecipeForm = () => { const { register, formState: { errors }, handleSubmit, } = useForm<Recipe>(); const submitForm = (formData: Recipe) => { console.log(formData); }; return ( <Container> <h1>New recipe</h1> <form onSubmit={handleSubmit(submitForm)}> <FieldSet label="Basics"> <Field label="Name" error={errors.name}> <Input {...register("name", { required: "Recipe name is required" })} type="text" id="name" /> </Field> <Field label="Description" error={errors.description}> <TextArea {...register("description", { maxLength: { value: 100, message: "Description cannot be longer than 100 characters", }, })} id="description" rows={10} /> </Field> <Field label="Servings" error={errors.amount}> <Input {...register("amount", { max: { value: 10, message: "Maximum number of servings is 10", }, })} type="number" id="amount" /> </Field> </FieldSet> <Field> <Button variant="primary">Save</Button> </Field> </form> </Container> ); };
If we try to submit the form with invalid data, we get handy validation messages for the corresponding fields.
It's also possible to apply custom validation rules to the fields using the validate rule. This can be done by defining a function or an object of functions with different validation rules. For instance, we can validate whether a field's value is equal using the following code:
jsx<Input {...register("amount", { validate: (value) => value % 2 === 0 })} type="number" />
jsx<Input {...register("amount", { validate: (value) => value % 2 === 0 })} type="number" />
For a more in-depth discussion of the form validation with React Hook Form, check out the post Form Validation with React Hook Form.
Handling Number Inputs
In the current form, we're using a number input field for the servings. However, due to how HTML input elements work, when the form is submitted, this value will be a string in the form data. In some cases, this might not be what we want, for example, if the data is expected to be a number on the backend. One easy fix would be to convert the amount to a number on submit, but it is not optimal, especially when we have many such fields. A better solution is to use valueAsNumber option to convert the input value to a number before submitting the form.
tsx<Field label="Servings" error={errors.amount}> <Input {...register("amount", { valueAsNumber: true, max: { value: 10, message: "Maximum number of servings is 10", }, })} type="number" id="amount" /> </Field>
tsx<Field label="Servings" error={errors.amount}> <Input {...register("amount", { valueAsNumber: true, max: { value: 10, message: "Maximum number of servings is 10", }, })} type="number" id="amount" /> </Field>
By setting the valueAsNumber option to true, the input value will be converted to a number before being submitted. This way, we can ensure that the form data is correctly formatted.
Controlled vs uncontrolled inputs in React Hook Form
If we needed more granular control over converting the input to a number, we could use controlled components. In React Hook Form, the difference between controlled and uncontrolled components is similar to traditional React components. Uncontrolled components in React Hook Form refer to inputs that are registered using the register function and have their state managed by the DOM. Controlled components, on the other hand, use the useForm hook to register inputs and manage their state by being wrapped into the Controller component.
One advantage of using controlled components in React Hook Form is that they provide more granular control over the input state, allowing for easier integration with external libraries and more complex validation logic. Uncontrolled components can be simpler to implement, especially for basic forms, but can be more difficult to customize for more complex use cases.
If we had a custom NumberInput component that we wanted to use in our form, we could wrap it in the Controller component to make it a controlled component.
tsx<Field label="Servings" error={errors.amount} htmlFor="amount"> <Controller name="amount" control={control} defaultValue={1} render={({ field: { ref, ...field } }) => ( <NumberInput {...field} id="amount" /> )} rules={{ max: { value: 10, message: "Maximum number of servings is 10", }, }} /> </Field>
tsx<Field label="Servings" error={errors.amount} htmlFor="amount"> <Controller name="amount" control={control} defaultValue={1} render={({ field: { ref, ...field } }) => ( <NumberInput {...field} id="amount" /> )} rules={{ max: { value: 10, message: "Maximum number of servings is 10", }, }} /> </Field>
Handling dynamic fields with useFieldArray
No recipe is complete without its ingredients. However, we can't add fixed ingredient fields to our form since the number of ingredients varies depending on the recipe. Normally, we would need to create our custom logic for handling dynamic fields. However, React Hook Form comes with a custom hook for working with dynamic inputs called useFieldArray. This hook takes the form's control object and the name for the field, returning several utilities for working with dynamic inputs. Let's see it in action by adding the ingredients fields to our recipe form.
tsximport styled from "@emotion/styled"; import { useForm, useFieldArray } from "react-hook-form"; import { Field } from "./Field"; import { FieldSet } from "./FieldSet"; import { Recipe } from "./types"; export const RecipeForm = () => { const { register, handleSubmit, formState: { errors }, control, } = useForm<Recipe>(); const { fields, append, remove } = useFieldArray({ name: "ingredients", control, }); const submitForm = (formData: Recipe) => { console.log(formData); }; return ( <Container> <h1>New recipe</h1> <form onSubmit={handleSubmit(submitForm)}> <FieldSet label="Basics"> <Field label="Name" error={errors.name}> <Input {...register("name", { required: "Recipe name is required" })} type="text" id="name" /> </Field> <Field label="Picture" error={errors.picture}> <Input {...register("picture", { required: "Recipe picture is required", })} type="file" id="picture" /> </Field> <Field label="Description" error={errors.description}> <TextArea {...register("description", { maxLength: { value: 100, message: "Description cannot be longer than 100 characters", }, })} id="description" rows={10} /> </Field> <Field label="Servings" error={errors.amount}> <Input {...register("amount", { valueAsNumber: true, max: { value: 10, message: "Maximum number of servings is 10", }, })} type="number" id="amount" /> </Field> </FieldSet> <FieldSet label="Ingredients"> {fields.map((field, index) => { return ( <Row key={field.id}> <Field label="Name"> <Input type="text" {...register(`ingredients.${index}.name`)} id={`ingredients[${index}].name`} /> </Field> <Field label="Amount"> <Input type="text" {...register(`ingredients.${index}.amount`)} defaultValue={field.amount} id={`ingredients[${index}].amount`} /> </Field> <Button type="button" onClick={() => remove(index)} aria-label={`Remove ingredient ${index}`} > − </Button> </Row> ); })} <Button type="button" onClick={() => append({ name: "", amount: "" })} > Add ingredient </Button> </FieldSet> <Field> <Button variant="primary">Save</Button> </Field> </form> </Container> ); }; const Row = styled.div` display: flex; align-items: center; justify-content: space-between; width: 100%; & > * { margin-right: 20px; } button { margin: 25px 0 0 8px; } `;
tsximport styled from "@emotion/styled"; import { useForm, useFieldArray } from "react-hook-form"; import { Field } from "./Field"; import { FieldSet } from "./FieldSet"; import { Recipe } from "./types"; export const RecipeForm = () => { const { register, handleSubmit, formState: { errors }, control, } = useForm<Recipe>(); const { fields, append, remove } = useFieldArray({ name: "ingredients", control, }); const submitForm = (formData: Recipe) => { console.log(formData); }; return ( <Container> <h1>New recipe</h1> <form onSubmit={handleSubmit(submitForm)}> <FieldSet label="Basics"> <Field label="Name" error={errors.name}> <Input {...register("name", { required: "Recipe name is required" })} type="text" id="name" /> </Field> <Field label="Picture" error={errors.picture}> <Input {...register("picture", { required: "Recipe picture is required", })} type="file" id="picture" /> </Field> <Field label="Description" error={errors.description}> <TextArea {...register("description", { maxLength: { value: 100, message: "Description cannot be longer than 100 characters", }, })} id="description" rows={10} /> </Field> <Field label="Servings" error={errors.amount}> <Input {...register("amount", { valueAsNumber: true, max: { value: 10, message: "Maximum number of servings is 10", }, })} type="number" id="amount" /> </Field> </FieldSet> <FieldSet label="Ingredients"> {fields.map((field, index) => { return ( <Row key={field.id}> <Field label="Name"> <Input type="text" {...register(`ingredients.${index}.name`)} id={`ingredients[${index}].name`} /> </Field> <Field label="Amount"> <Input type="text" {...register(`ingredients.${index}.amount`)} defaultValue={field.amount} id={`ingredients[${index}].amount`} /> </Field> <Button type="button" onClick={() => remove(index)} aria-label={`Remove ingredient ${index}`} > − </Button> </Row> ); })} <Button type="button" onClick={() => append({ name: "", amount: "" })} > Add ingredient </Button> </FieldSet> <Field> <Button variant="primary">Save</Button> </Field> </form> </Container> ); }; const Row = styled.div` display: flex; align-items: center; justify-content: space-between; width: 100%; & > * { margin-right: 20px; } button { margin: 25px 0 0 8px; } `;
useFieldArray returns several utilities for managing dynamic fields, including append, remove, and the array of the fields themselves. The complete list of utility functions is available on the library's documentation site.
Since we do not have default values for ingredients, the field is initially empty. We can start populating it by using the append function and providing default values for empty fields. Note that the fields are rendered by their index in the array, so it's important to have field names in the format fieldArrayName.fieldIndex.fieldName. We can also delete fields by passing the index of the field to the delete function.
Now, after adding a few ingredient fields and filling in their values, when we submit the form, all those values will be saved in the ingredients field in the form.
That's all it takes to build a fully functional and easily manageable form with React Hook Form. The library has plenty more features, not covered in this post, so make sure to check the documentation for more examples.
Testing the form
Testing forms is an essential part of the development process as it helps ensure that the form works correctly and can catch any future regressions.
Testing forms is a broad topic on its own, and it is covered in a separate post: Testing React Hook Form With React Testing Library.
Conclusion
In this tutorial, we covered the basics of using React Hook Form, a library for managing forms in React. We created a simple recipe form, including basic fields like recipe name, description, and servings. We then learned how to handle form validation and error messages, as well as how to create custom validation rules. We also demonstrated how to use the Controller component for working with controlled input fields.
Finally, we explored how to add dynamic fields using the useFieldArray hook, which allowed us to dynamically add and remove ingredients. By the end of the tutorial, we had a fully functional form that could handle dynamic fields with ease.
Dealing with forms in React can indeed be challenging, especially when it comes to dynamic fields. However, as we've demonstrated in this tutorial, using React Hook Form can significantly simplify the process. With features like built-in validation, error handling, and support for dynamic fields, React Hook Form is a powerful tool for building robust and maintainable forms.
References and resources
- @emotion/styled
- Advanced Multistep Forms with React Hook Form
- Build a Multistep Form With React Hook Form
- Display Warning for Unsaved Form Data on Page Exit
- Form Validation with React Hook Form
- GitHub repository with the code for the tutorial
- Introduction to Type Inference In TypeScript
- MDN: Document Object Model (DOM)
- React Hook Form: 'register' API
- React Hook Form
- Simplifying Form Rendering In React with Field Component Abstraction
- Testing React Hook Form With React Testing Library
- TypeScript website
- Understanding Controlled vs Uncontrolled Components In React
- Using Generics In TypeScript: A Practical Guide
- useFieldArray documentation